
Chapter 6: Working with Buyers + Sellers
Your Buyer + Seller Guides —
HOUSEKEEPING
The RG+CO. Buyer + Seller Guides are delivered as Canva files, which you will find in the next lesson.
A Canva Pro Subscription is required to fully customize your guides.
If you are new to Canva, you can click here to subscribe.
Depending on how much you change the guides, editing each should only take about an hour.
All photos and text in each guide can be edited if you like. You may also choose to use much of it as they are.
STEP 1:
Click on the link(s) provided below to access the file(s).
Step 2:
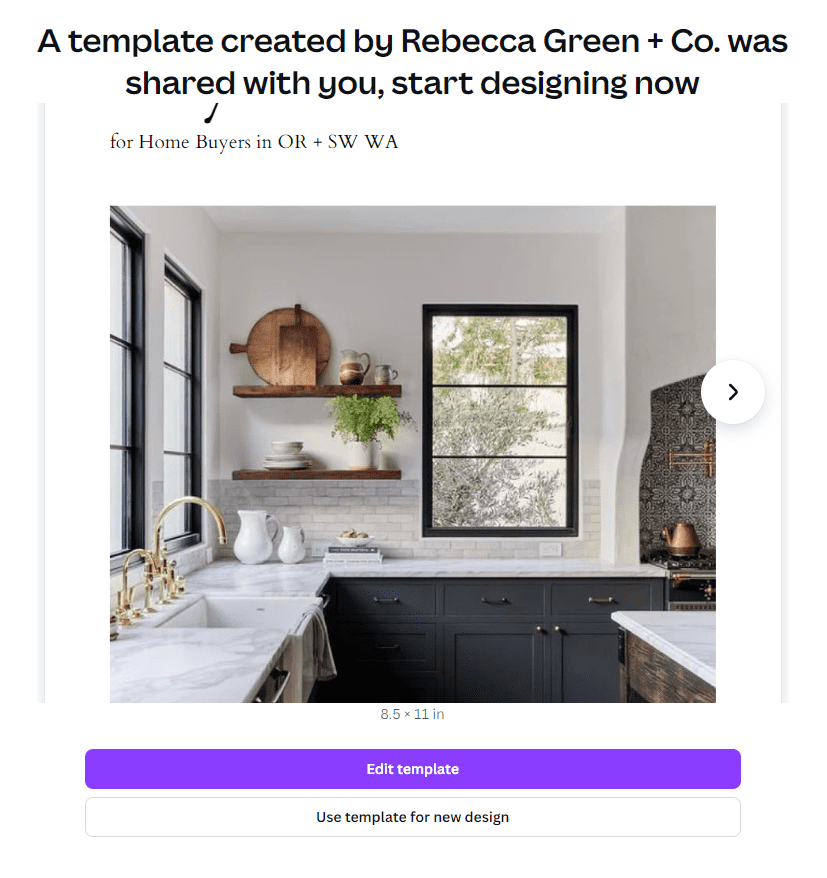
A new tab just like you see below will open. From the popup, click “Use Template for New Design”.
STEP 3:
Another popup will appear prompting you to sign up or sign in:
If you need to sign up: Select “Continue with Google”, “Continue with Facebook”, “Continue with Email”, or “Continue Another Way” to create your free account.
If you have an account and need to sign in: Select “Continue with Google”, “Continue with Facebook”, “Continue with Email”, or “Continue Another Way”, and enter your credentials.
If you have an account and are already signed in: See STEP 4.
STEP 4:
Once logged in, the Canva file should open automatically and will get copied to your account. The file will be called “Copy of RGCO [Buyers/Sellers] Guide”.
STEP 5:
We recommend creating a copy of your new Canva file and renaming it to include “Backup Version”. The original version of your Canva file should be renamed to include “Working Version” or similar — this is the one you’ll make edits in.
To Copy + Rename a Canva Project:
Copy a Canva File: Click “File” on the top left of your screen and navigate to the “Make a Copy” option.
Rename a Canva File: Click on the document's name in the top right of your screen and type to rename it.
BONUS:
All photos, fonts, text, and colors can easily be changed once you have saved the files into your Canva account. The guides are all fully editable, but don't forget that you can use many of the pages just as they are. These are far more than just templates. These are professionally designed presentations. We are going to cover some tips and tricks on editing in the next lesson.
Editing in Canva
Brand Kit Set-Up: You may want to get this done as soon as you get your Canva account set up.
Grid View: This can be a great way to view your entire presentation and for moving pages if you want to reorder anything. Just remember that the spreads start on Page 2. Your first and last pages will be the covers, therefore, not next to any other pages. The grid view is the 4 squares on the bottom right of your screen.
Rearranging Pages in Grid View: Hover over the page you want to move and drag it to the new position. You will see a line appear between pages; drop it there to move it.
Changing Fonts: Click to select the text box that you want to edit, and use the text toolbar that appears above the editor to format your text. Click on the font dropdown to select or search for fonts
Editing Text: To edit text, click on the text box you wish to modify. A text toolbar will appear, allowing you to change the font, size, color, and other formatting options
Editing Images: To edit an image, click on it to reveal the image toolbar. You can adjust the brightness, contrast, and other image settings or drag another image in to replace the one in the design.
Reordering and Layering: To reorder elements, select the element you wish to move, click on the 'Position' option in the toolbar, and choose whether you want to move the element forward or backward.
Canva Design School: Remember, Canva also offers a host of tutorials and resources via their Design School if you need more detailed instructions or want to learn more advanced techniques.
I’d love to see your finished product! If you want us to review the guides that you customize, jump in and schedule a 1:1 15-minute consultation. Include a link to your guide or attach the PDF so I can review it before our call!
Printing your guides
Your completed guides will be fantastic additions to your digital content library and look stunning in print. In the video for this lesson, I’ll walk you through step-by-step instructions and provide screenshots for printing your guides using Canva or Mixam.
Personally, I love the guides printed in a magazine style with the same professional binding you’d find on major publications. While Mixam offers this binding option, Canva does not, but both platforms do provide spiral-bound options.
I prefer the guides printed magazine style with the same binding as you see on most major publications. Mixam is an option for this, but not Canva. Both have spiral-bound options.
There are many companies you can use to print these guides, but I’ve tried several, and Mixam consistently offers better pricing and quality. I recommend a soft-touch cover with low-gloss interior pages, though we’ve also printed them in gloss, which looks great too! To set up an account with Mixam, just click here.
11 Ways to Use Your Guides
The RG + CO. Buyer and Seller Guides are so much more than just templates. They are complete presentations and were designed to be adaptable. They will save you time, help you generate more business, and elevate the client experience if used correctly and consistently. Both guides are completely customizable and all photos, copy, fonts, and colors can easily be edited. You can also use all of the supplied images and text as you please.
There is an element of refining your presentation by repeatedly using the same materials. Everything you offer to your clients becomes easier to speak to. This can quickly instill confidence in your clients as they recognize you have a well-established process in place.
Of course we love our guides for buyer and seller presentations but why stop there…..
Here are some additional ways to use the guides once you’ve customized them:
Digital version on your website: These guides can be a ready resource to educate potential clients about you and how you help navigate the buying and selling process. This can save time explaining basic concepts and allow clients to learn independently. Great as a flip book! It's nice to integrate the guide links into emails that you regularly send to your clients.
Link in your email signature: How many emails do you send daily? Drop a link to your guides in your email signature so people can quickly learn more about your services.
Link on your bio site: If you have a separate bio site for social media, linking to these guides can provide additional value and information to visitors.
Link in your bio on social media: Adding links to your guides on your social media bios can increase your credibility.
As a post on social media: As a whole, the guides can easily be shared on social media, but it is also super easy to use excerpts from the guides for additional social media posts.
Prelist drop-off: Package your Sellers Guide with some of your beautifully created property brochures and/or postcards, and drop this off the day before your listing appointment with a handwritten note attached. You’d be surprised at how many listings you’ll get before you even meet the seller!
Handouts at educational seminars: Have you ever considered hosting a First-Time Homebuyer Seminar, an Investment Property Class, or a Flip Workshop but were unsure what to use as a handout? A few quick edits to some of the additional pages and your Buyers Guide would be an excellent solution!
Open house handout: Having printed copies of the Buyers Guides at all open houses easily enhances your interaction with visitors. You could take this further by creating a flyer with a QR code to display on a stand at the open house for your techy guests. What about including a QR code that links to your guides on your property flyers?
As a lead magnet: Offering these guides as a free resource in exchange for contact information can help you generate leads. This can simplify your lead generation process as you have readily available high-quality content to deliver. Have you heard of Many Chat to send auto-responses on IG or Facebook?
Revised version for expired listing marketing: Creating a short version of the guides you send to expired listings and a handwritten note can yield great responses. You could also drop off a pre-list packet to an expired listing in an area that you farm, your neighborhood, or in a price range that you are trying to break into or continue to work.
There are a million other ways to easily repurpose the presentations. I challenge you to find a few ways to consistently weave the guides into the work that you are already doing to position you as a knowledgeable professional who is ready to assist at any time.